Notes about Tut3D
Some notes about Tutorial on creating a 3D game with LibGDX. I use Sublime Text 4 and CMD. This is good for badget laptops.
Table of contents:
- Documentation
- Step 1 - Lift off
- How to run gdx-liftoff from the command line (CMD or Far Manager)
- Settings for gdx-liftoff
- Source files
- How to change keys
- How to print to the console
- How to move the camera sideways using the A and D keys
- How to build for Desktop, Android, and Web
- How to enable anti-aliasing
- Click to see a result in the browser of the free Netlify hosting. You can rotate (LMB), zoom (MMB), and pan (RMB) the camera. Use W and S to move forward and back and A and D to move left and right
Documentation
- Download the gdx-1.12.1-javadoc.jar file here Unzip it with WinRAR. Place unzipped folder to some directory, for example to: E:/_Docs. Open the index.html: E:/_Docs/gdx-1.12.1-javadoc/index.html just by double click. Save opened page to bookmarks of your browser. For example, Chrome has good bookmarks
- Download a source code from the libGDX repository
- The online documentation is not available sometimes
Step 1 - Lift off
How to run gdx-liftoff from the command line (CMD or Far Manager)
- Download gdx-liftoff-1.12.1.8
- Create the E:\Program Files (installed)\Libgdx Tools folder and copy gdx-liftoff-1.12.1.8.jar there
- Create the E:\bats folder. Create the gdx-liftoff.bat file there. Copy the following content to the created file:
start "" "E:\Program Files (installed)\Libgdx Tools\gdx-liftoff-1.12.1.8.jar"
Settings for gdx-liftoff
I prefer HTML/GWT instead of HTML/TeaVM. Because:
- GWT is built faster
- I can use "http-server" because GWT is built to the "dist" folder with the command gradlew html:dist
- It doesn't require to set "config.width = 0" and "config.height = 0"
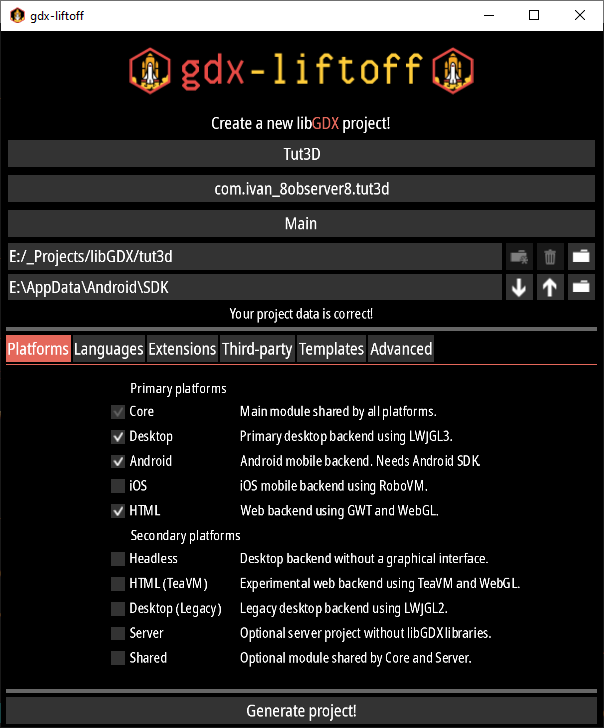
Set "Platforms" (click to show a screenshot)
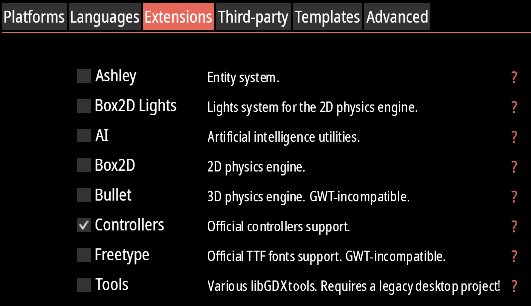
Set "Extensions" (click to show a screenshot)
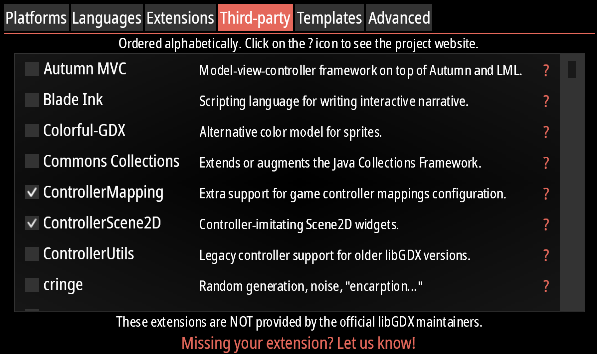
Set "Third party" (click to show a screenshot)
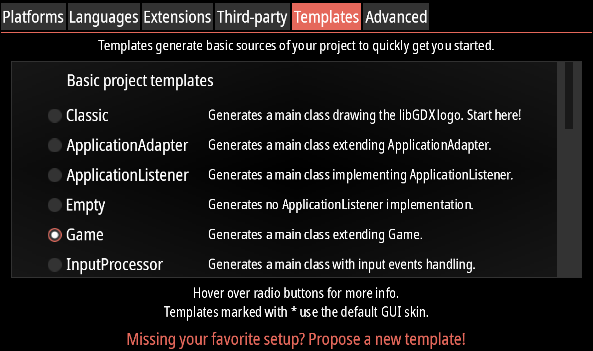
Set "Templates" (click to show a screenshot)
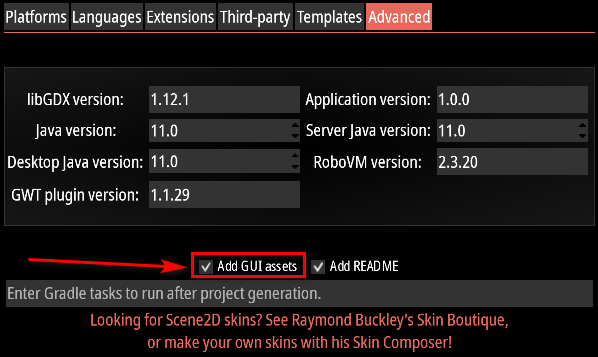
Set "Andvanced" (click to show a screenshot)
- Press the "Generate Project!" button
- Rename "FirstScene.java" to "GameScene.java"
- Add the following content to the files:
Source files
Main.java
package com.ivan_8observer8.tut3d;

import com.badlogic.gdx.Game;

/** {@link com.badlogic.gdx.ApplicationListener} implementation shared by all platforms. */
public class Main extends Game {
    @Override
    public void create() {
        setScreen(new GameScreen());
    }
}
GameScreen.java (click here to show a source code)
package com.ivan_8observer8.tut3d;

import com.badlogic.gdx.Gdx;
import com.badlogic.gdx.ScreenAdapter;
import com.badlogic.gdx.graphics.Color;
import com.badlogic.gdx.graphics.Texture;
import com.badlogic.gdx.graphics.VertexAttributes;
import com.badlogic.gdx.graphics.g2d.TextureRegion;
import com.badlogic.gdx.graphics.g3d.*;
import com.badlogic.gdx.graphics.g3d.attributes.ColorAttribute;
import com.badlogic.gdx.graphics.g3d.attributes.TextureAttribute;
import com.badlogic.gdx.graphics.g3d.environment.DirectionalLight;
import com.badlogic.gdx.graphics.g3d.utils.CameraInputController;
import com.badlogic.gdx.graphics.PerspectiveCamera;
import com.badlogic.gdx.graphics.g3d.utils.ModelBuilder;
import com.badlogic.gdx.utils.Array;
import com.badlogic.gdx.utils.ScreenUtils;

/** First screen of the application. Displayed after the application is created. */
public class GameScreen extends ScreenAdapter {
    public final Color BACKGROUND_COLOUR = new Color(153f/255f, 220f/255f, 236f/255f, 1.0f);

    private PerspectiveCamera cam;
    private CameraInputController camController;
    private Environment environment;
    private Model modelGround;
    private Texture textureGround;
    private Array<ModelInstance> instances;
    private ModelBatch modelBatch;

    @Override
    public void show() {
        // Prepare your screen here.
        cam = new PerspectiveCamera(67, Gdx.graphics.getWidth(),  Gdx.graphics.getHeight());
        cam.position.set(10f, 1.5f, 5f);
        cam.lookAt(0,0,0);
        cam.near = 1f;
        cam.far = 300f;
        cam.update();

        camController = new CameraInputController(cam);
        Gdx.input.setInputProcessor(camController);

        environment = new Environment();
        environment.set(new ColorAttribute(ColorAttribute.AmbientLight, 0.6f, 0.6f, 0.6f, 1f));
        environment.add(new DirectionalLight().set(0.8f, 0.8f, 0.8f, -1f, -0.8f, -0.2f));

        String textureGroundPath = "textures/Stylized_Stone_Floor_005_basecolor.jpg";
        textureGround = new Texture(Gdx.files.internal(textureGroundPath), true);
        textureGround.setFilter(Texture.TextureFilter.MipMapLinearLinear, Texture.TextureFilter.Linear);
        textureGround.setWrap(Texture.TextureWrap.Repeat, Texture.TextureWrap.Repeat);
        TextureRegion textureRegion = new TextureRegion(textureGround);
        int repeats = 10;
        textureRegion.setRegion(0, 0, textureGround.getWidth() * repeats,
            textureGround.getHeight() * repeats);

        ModelBuilder modelBuilder = new ModelBuilder();

        // create model
        modelGround = modelBuilder.createBox(100f, 1f, 100f,
            new Material(TextureAttribute.createDiffuse(textureRegion)),
            VertexAttributes.Usage.Position | VertexAttributes.Usage.Normal |
            VertexAttributes.Usage.TextureCoordinates);

        // create and position model instances

        instances = new Array<>();
        instances.add(new ModelInstance(modelGround, 0, -1, 0)); // 'table top' surface

        modelBatch = new ModelBatch();
    }

    @Override
    public void render(float delta) {
        // Draw your screen here. "delta" is the time since last render in seconds.

        // update
        camController.update();

        // render
        ScreenUtils.clear(BACKGROUND_COLOUR, true);
        modelBatch.begin(cam);
        modelBatch.render(instances, environment);
        modelBatch.end();
    }

    @Override
    public void resize(int width, int height) {
        // Resize your screen here. The parameters represent the new window size.
        cam.viewportWidth = width;
        cam.viewportHeight = height;
        cam.update();
    }

    // @Override
    // public void pause() {
    //     // Invoked when your application is paused.
    // }

    // @Override
    // public void resume() {
    //     // Invoked when your application is resumed after pause.
    // }

    @Override
    public void hide() {
        // This method is called when another screen replaces this one.
        dispose();
    }

    @Override
    public void dispose() {
        // Destroy screen's assets here.
        modelBatch.dispose();
        modelGround.dispose();
        textureGround.dispose();
    }
}
How to change keys
You can change Keys. For example, I have moved rotated keys (A and D) to the K and L keys:
import com.badlogic.gdx.Input.Keys;
camController.rotateRightKey = Keys.K;
camController.rotateLeftKey = Keys.L;
How to print to the console
Import the following packages:
import com.badlogic.gdx.Application;
import com.badlogic.gdx.Gdx;
Call Gdx.app.setLogLevel(Application.LOG_DEBUG); once only but before Gdx.app.log() method. Call Gdx.app.log("my tag", "Create was called"); where do you wont:
Gdx.app.setLogLevel(Application.LOG_DEBUG);
Gdx.app.log("my tag", "Hello, World!");
How to move the camera sideways using the A and D keys
- Download the CameraInputController.java file and place it in the same directory with the GameScreen.java and Main.java files
- Delete the import com.badlogic.gdx.graphics.g3d.utils.CameraInputController; line inside of the GameScreen.java file
- Open the CameraInputController.java file, find these three lines inside of the process() method, and copy them:
camera.translate(tmpV1.set(camera.direction).crs(camera.up).nor().scl(-deltaX * translateUnits));
camera.translate(tmpV2.set(camera.up).scl(-deltaY * translateUnits));
if (translateTarget) target.add(tmpV1).add(tmpV2);
if (rotateRightPressed) {
    // camera.rotate(camera.up, -delta * rotateAngle);
    camera.translate(tmpV1.set(camera.direction).crs(camera.up).nor().scl(-translateUnits * delta));
    if (translateTarget) target.add(tmpV1).add(tmpV2);
}
if (rotateLeftPressed) {
    // camera.rotate(camera.up, delta * rotateAngle);
    camera.translate(tmpV1.set(camera.direction).crs(camera.up).nor().scl(translateUnits * delta));
    if (translateTarget) target.add(tmpV1).add(tmpV2);
}
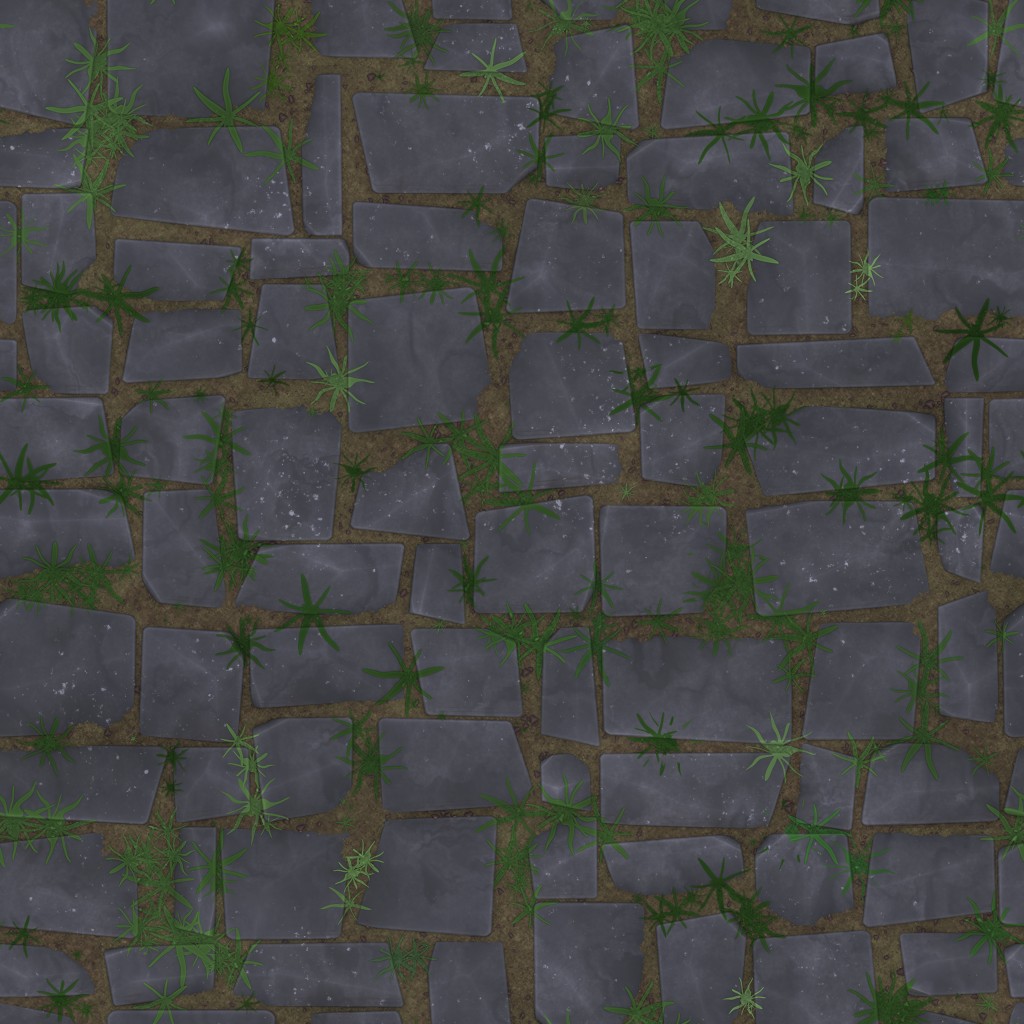
Texture
This is the "Stylized_Stone_Floor_005_basecolor.jpg" texture that should be in the "assets/textures" folder. RMB (right mouse button) click on the image below, choose "Save image as...", and save it to the "assets/textures" folder:
How to build for Desktop, Android, and Web
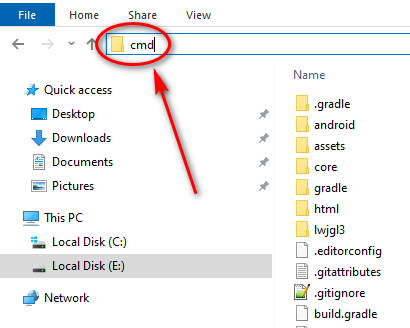
Open CMD or Far Manager. You can open cmd in the root folder of the project by typing cmd in text text field (and press Enter):
Desktop:
- Type the following command to run on Desktop: gradlew lwjgl3:run
- Type the following command to create the executable ".jar" file for Desktop: gradlew lwjgl3:jar
Android:
- Install Android SDK, NDK, and JDK. I advice to install the Qt framework. It is simple to install Android tools from Qt Creator settings. Complete the following tutorial: Download and install Android SDK, NDK, JDK
- Type the following command to install on real device connected with USB-cable or on running Android emulator: gradlew android:installDebug See my step by step tutorial: Activate a developer mode on your device to debug with USB-cable
- Type the following command to create a debug APK: gradlew android:assembleDebug
- Type the following command to create a release APK: gradlew android:assembleRelease
HTML/GWT:
- Type the following command to create a web application: gradlew html:dist
- Install Node.js
- Type in CMD npm i -g http-server to install "http-server"
- type: http-server -c-1 inside of "tut3d/html" to run "http-server"
- Go to the browser and type in the address field: localhost:8080/build/dist/index.html to run the application
- When you changed something in your project: make a build again: gradlew html:dist
- Go to browser (where you see the privious scene)
- Open a debug console of the browser: "Ctrl+Shift+J" (in Chrome and Edge)
- Press with RMB on the reload button and select "Empty Cache and Hard Reload" to reload the page
- See my step by step tutorial how to deploy your application on the free 'www.netlify.com' hosting: Distribute your builds on the free 'www.netlify.com' hosting
How to enable anti-aliasing
LWJGL3 : configuration.setBackBufferConfig(8, 8, 8, 8, 16, 0, 2);
LWJGL2 : configuration.samples = 2;
GWT    : configuration.antialiasing = true;
Android: configuration.numSamples = 2;
iOS    : configuration.multisample = GLKViewDrawableMultisample._4X;
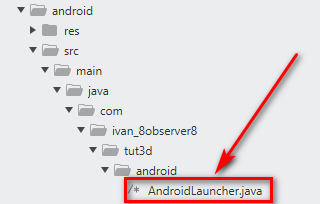
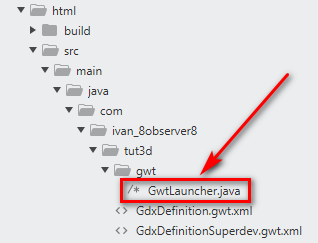
Add the configuration above the the files:
Desktop:
Android:
HTML/GWT:
Note. You can see what the parameters of the "setBackBufferConfig()" method mean in the Lwjgl3ApplicationConfiguration.java#L159 file in the documentation:
   /** Sets the bit depth of the color, depth and stencil buffer as well as multi-sampling.
     *
     * @param r red bits (default 8)
     * @param g green bits (default 8)
     * @param b blue bits (default 8)
     * @param a alpha bits (default 8)
     * @param depth depth bits (default 16)
     * @param stencil stencil bits (default 0)
     * @param samples MSAA samples (default 0) */
    public void setBackBufferConfig (int r, int g, int b, int a, int depth, int stencil, int samples) {
        this.r = r;
        this.g = g;
        this.b = b;
        this.a = a;
        this.depth = depth;
        this.stencil = stencil;
        this.samples = samples;
    }
Click to see a result in the browser of the free Netlify hosting. You can rotate (LMB), zoom (MMB), and pan (RMB) the camera. Use W and S to move forward and back and A and D to move left and right